

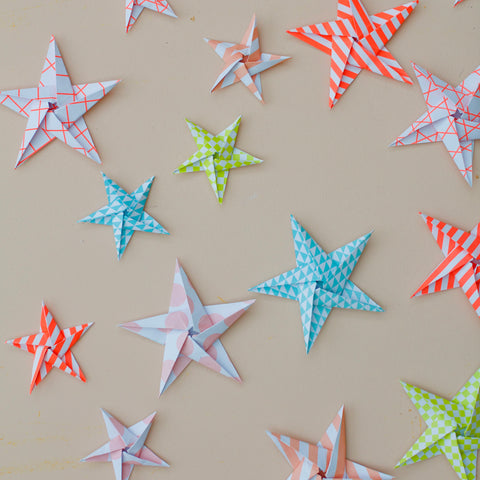
Here at Cotton Clara we love to add our own hand made decorations at Christmas! We’ve been making origami paper stars to make a festive garland to hang on the fireplace or strewn around the Christmas tree.
To make an origami star for yourself, you need to start with a square piece of paper, we’re using paper from our patterned paper pad that you can buy on our website here.
But you could always use plain paper, newspaper or brown paper!
We used two sizes of stars to make our garland, starting with a square of 12cm x 12cm and 18cm x 18cm but any size square will work exactly the same. Top tip: Don’t use card as it makes it very difficult to fold later on in the process.

The first step is to make your square in to a pentagon, start with the paper patterned side down and fold in half to make a rectangle.

Take the bottom left corner and fold up to meet the top edge, press firmly to create a nice clean crease. Unfold the corner and do exactly the same with the top left corner, folding down to meet the bottom edge of your rectangle and unfold.


Next take the bottom right corner and bring it up to meet the middle point where the two previous folds meet. Again pressing firmly.

Then take the the same corner and fold over to meet to right side. Halving to make a little triangle shape.

Next take the bottom edge and bring it up to meet the edge of the triangle shape and fold firmly. Ensuring the two edges meet flush.

Turn over your paper and take the left side and fold it to the right, making another cone shape.


Take a pair of scissors and cut off the top, creating a triangle.


Finally unfold your shape to reveal the pentagon.

Next we can start making the star!
Start with the pentagon shape facing patterned side down, with one of the points at the top. Bring the bottom two corners up to meet the folds you just made. (Roughly at 10 o’clock and 2 o’clock and press firmly). Unfold and make the exact same fold for all 5 edges of the pentagon. unfolding each crease every time.


Starting with the pentagon flat again with the pattern side down and one point at the top. Fold in the left side on one of the creases you just made and at the same time pulling the corner of the pentagon to the left and fold flat. Unfold completely and repeat this on all 5 sides of the pentagon. This creates creases ready for you to fold in to make the star shape.


Starting with the pentagon flat again pattern side down, pinch all 5 corners together and squash them towards the centre. Take it nice and slow and make sure the star shape is beginning to appear before you squash it all down. When it is folded correctly a little pentagon shape will appear in the centre of the star.


Turn the star shape and take one of the right edges of the star to the centre line and fold, pressing firmly and making sure the star points are nice and neat.


Do the same to all of the star edges. Always meeting the centre point.

Once you have folded all the edges on the star your origami star is complete!

You could attach them to some cord to make a garland or you could use them as gift tags on your presents, tree decorations or even place names on your Christmas dinner table!